
Power BI Pipelines
- Rohit Kumar

- Sep 29, 2022
- 4 min read

In today’s world, data means power and to use that power efficiently we need to analyse it properly. It’s a great responsibility to handle a large amount of data and present it in a prudent way so that the end user can easily grab the details of any data. The data can be
reports, paginated reports, dashboards, datasets and dataflows.
At times it get hard to manage the code sync for this data between Dev, Test and Production environments. Power BI lets us do this in easy way using Power BI Pipelines. Pipelines in Power BI is a very intuitive and responsive service and notifies us of any changes between different environments.
Deployment Pipelines have three stages:
Development
Test
Production
Working with Deployment Pipelines
Step1: Create a Deployment Pipeline
To create a pipeline we have two options:
From Deployment Pipelines Tab:
In the navigation pane on the left side of the Power BI service, choose the option of Deployment Pipelines. After that click on Create pipeline.

After clicking on Create Pipeline button a window pops-up which contains a dialogue box for the Name and Description of the pipeline. Fill the area with a suitable Name and Description of the pipeline and click on the Create button.
From a Workspace:
From the workspace, select Create a pipeline.

We get the window of Name and Description of the pipeline. Fill the fields with a suitable Name and Description and then hit the Create button.

Step2: Assign a workspace
To work with the Deployment Pipelines, we should have Premium per user Workspace. To change the workspace into Premium per user Workspace we can follow the steps mentioned below in the screenshot.


The workspace will show a diamond icon as shown in the above screenshot. It signifies the workspace is now Premium per user workspace
After hitting Create button we get a window which shows all the three stages of a pipeline. We can assign only one workspace to one pipeline. Click on Assign a workspace button.
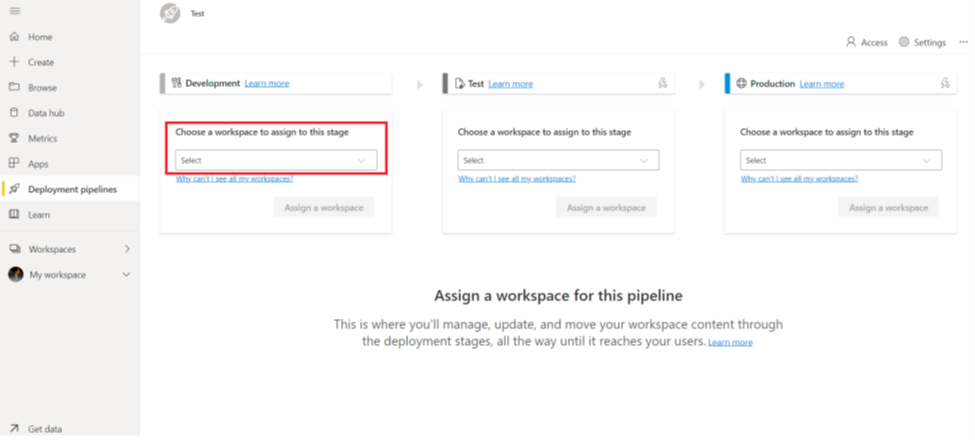
We get a dropdown where we can select workspace name and any stage (Production, Test or Production). It is not necessary to start with Production stage. We can start with any stage out of the three. Choose the stage you want to start with and click on Assign.

Now, As we click on the Assign button we get some initial looks of that workspace, such as reports, datasets and dashboards.

Deploying Contents
As we get the initial looks of the workspace, we can deploy it to other stage. It creates a duplicate workspace which contains all the details of the source stage. To do that click on the Deploy button and it will deploy all the contents of the source stage to the target stage.


We can also deploy the selective contents. To do that select the Show more option and select the content you want in your target stage. Then hit Deploy button and we will get only the selected content in the target stage.


We have another option "Select related" after selecting the specific content. The items that are related to the specific items automatically got selected. For example, if we have created a report then it has its dataset. So, when we select the report and choose the option Select related the dataset automatically got selected.

Comparing content of stages
When we deployed content from one stage to other, there is a Green indicator between source and target stage. It means everything is in sink in both source and target stages.

If we made some changes in source or target then the indicator colour changes to Orange.

When there is a change in any stage the changed item(s) get some labels.
If there are items, which are in the Source side and it does not exist in the Target side, then the items get the label which is represented by a + sign.

If there are items that were same on the both Source and Target side but after deployment, the item on one side got changed then it is labelled as different. After deployment, the source stage item gets copied to the target side. It is independent of the fact where the changes were made.

If there is an item that exists in the Target side but missing from the Source side, then it gets Missing from (-) label.

Deployment Rules
In Deployment Pipelines we can change the configuration of different stages. For example, if our development dataset points to development database and we have deployed it to test but we want to point it out to the test database after the deployment, we can do it by using Deployment Rules.
To create the Deployment rules we should follow the following steps:
Step1: Select the Deployment Setting option for the stage that needs to be modified.

Step2: Select the dataflows, datasets and paginated report from the list.

Step3: We have two types of rules:
1. Data source rules
2. Parameters rules
Select the type of rule you want to add and then click on Add rule to add the rule for the dataset, reports etc. We can replace the data source with the new one in this option.


In the Parameter rules, we can choose the parameter from the dropdown list of Parameter rules and then choose the value to apply on the Parameter.
When all the settings are done, hit Save and close.
Now the settings are applied to the stage that was selected and now the rules will be applied till further changes.
Backwards Deployment:
Sometimes we need to deploy items to a previous stage. For example, we can deploy items from Production to Test and then Test to Development.
It can be possible only if the previous stage is empty and we can’t choose a specific item to deploy. All the contents of the current stage will be deployed to the previous stage.
Conclusion:
Deployment Pipelines gives us the freedom to use different workspaces for different purposes and the advantage is that we don’t need to create Test and Production Workspaces. Power Bi will do it for us. So, it is very easy to migrate data from one workspace to another and catch the discrepancies if there are any. Use it when managing multiple reports in multiple environments.


Comments