


Power Automate as Bridge to Write-back on Synapse Using Power Apps
- Ritu Negi

- Jul 28, 2022
- 4 min read

The Write-Back functionality enables end-users to give input and update the data in the data warehouse directly from the BI report. In addition, this helps BI professionals to have a rich user experience in deploying solutions for budgeting, forecasting, planning, and adding comments.
This functionality can be achieved using Power Apps. There is no connector for Azure Synapse in PowerApps, therefore, the write-back to Synapse using Power Apps does not work directly.
This blog is to show the process of write-back on Azure Synapse using Power Apps while making Power Automate a bridge.
Power Automate has a Synapse connector that allows the changes in the database. For this we need a Synapse SQL table in which the data will be stored (Created WriteBackTable table), a power app form that has some input fields and a submit button. Then we will create a flow in power automate that will be then called in Power Apps Submit Button.
Here, the WriteBackTable is being used as a base table on which the Fact table will be created to show the Daily and Monthly Goal for different department in each month. The Department, Monthly Goal and Number of working days will be entered by the users using PowerApps. Below is the script for WriteBackTable:

The RowId is the primary key for unique Department and Month Year, which can be used further to decide weather the record will be inserted or updated. Initially there is no record in the table so the data will be inserted:

Below is the complete flow which is explained further in detail:


For creating the flow, first we need to click on Create and select the Instant Cloud Flow:

Then we need to select the trigger of this flow as PowerApps and give our flow a name and then click on Create:

After that, we need to initialize a variable that we call from PowerApps:

We can Name the variable as we want and when we click on the value, the Dynamic content option pops up and we need to click on Ask in PowerApps:

This step will be repeated as many times as we have input fields in our PowerApps form, for me, its 4 so used 4 Initialize Variables as below.

Once we will initialize all the variables then we will add action Execute a SQL query (V2) under Azure SQL Data Warehouse to see if there are any records in the Synapse table for the key columns entered by PowerApps.
We are using "Azure SQL Data Warehouse" connector that allows us to connect to Azure Synapse and run SQL queries and stored procedures to perform CRUD (create, retrieve, update and delete). But it is available only in Power Automate and not in Power Apps and that is why we are using Power Automate as a bridge here:

In this option, we need to create a connection by clicking the three dots on the top right corner and then click on Add new connection:

Then we need to insert credentials for Azure Synapse Dedicated SQL pool using Basic username and password.

Once you will establish the connection, the Server Name and Database will come in the drop-down list and you can select them and write your query as above.
Note: We need to define the parameters and the data types that we need in our query. Here we need Department and MonthYear as the key columns (on the basis a record will be inserted/updated) so two parameters are created. Then assign the value by selecting the corresponding variable (coming from the PowerApps) from the Dynamic Content:

After this step we need to decide if the record will be inserted or updated in the table so we need to add a new step Condition:

In this step, we need to write an expression to know if the select query in the previous step returns any data or not. Here the expression is as below:
empty(outputs('Execute_Select_from_Synapse')?['body/resultsets/Table1'])
But instead of copying the above line of code, you can run the flow and see the output for this step and note in which set you are getting the result, and then use the empty function in Dynamic content and select that set:

Now if the condition is True, i.e., the result set is empty then we need to insert the record else the update will be done. Therefore, for this we need to use the Execute a SQL query (V2) again and use the insert and update query:

After the flow is completed, go to PowerApps and click on the Submit button in the form on which we want to call the Power Automate flow and then click on Action and then Power Automate:

Then select your flow and give the parameters as below:
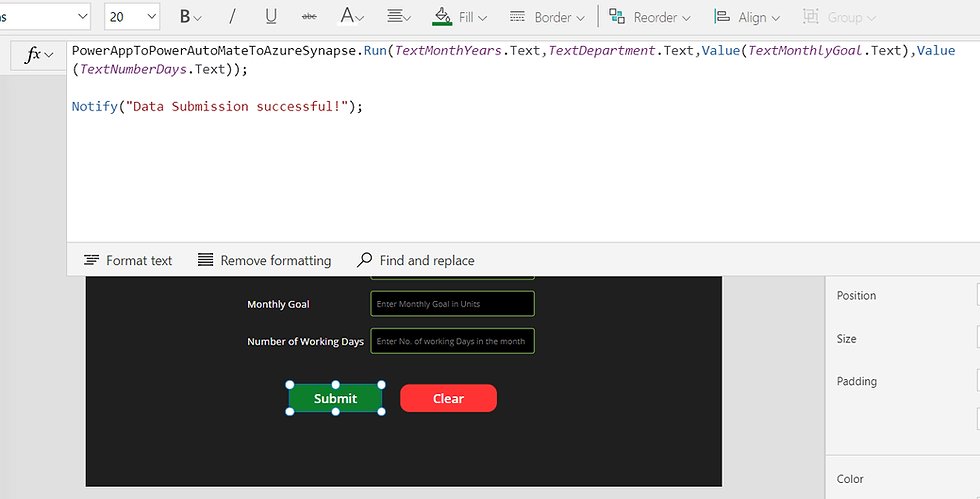
This App can be called using Power BI and whenever the user will enter values in the form and click on the submit button. The flow will then get triggered and data will be inserted/updated in the Synapse Database.
Conclusion: The PowerApps does not have any connector to Azure Synapse and hence there is no direct way to write back to the synapse database but using Power Automate as a bridge, we can use this functionality without having any trouble.


コメント